
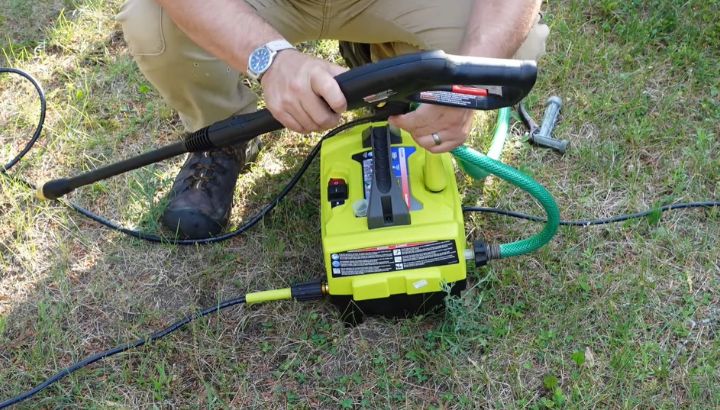
Connect the garden hose to the water inlet, attach the high-pressure hose and gun, choose the correct nozzle for your surface, open the water supply fully, then power on and squeeze the trigger. Always prime the pump by bleeding air through the trigger while the machine is unplugged before starting. Hold the wand 12 to 24 inches from the surface, match the nozzle angle to the material, and apply detergent with the black tip before rinsing.
Most Ryobi pressure washer frustrations trace back to skipped basics: wrong nozzle, no priming, undersized supply hose.
This guide on how to use Ryobi electric pressure washer covers every stage from first assembly to winter storage. You will learn correct pump priming, nozzle selection, soap application, surface technique, and seasonal maintenance in one practical resource.
Know Your Machine Before You Connect Anything
Understanding the machine before touching a hose prevents the majority of beginner errors. Ryobi’s electric lineup shares consistent design logic across all models, so core component locations stay familiar regardless of which unit you own.
Key Components and What Each One Does
The water inlet is the threaded port where the garden hose connects to the machine. Sitting behind a small removable cap directly at that port is the inlet filter, a mesh screen that catches sediment before it reaches the pump.
The high-pressure hose carries amplified water from the pump outlet to the trigger gun. The wand extension attaches to the gun body, and the nozzle tip fits onto the wand end through a quick-connect fitting.
The unloader valve inside the pump body recirculates water back to the inlet whenever the trigger is released. This prevents dangerous pressure spikes when the spray path is closed between passes.
Ryobi Electric Model Lineup and Specifications
Choosing the right model for your actual workload prevents both underwhelming results and unnecessary surface damage. The table below covers the main Ryobi electric models with their real-world performance characteristics.
| Model | PSI | GPM | Motor Type | Best Application | Key Feature |
|---|---|---|---|---|---|
| RY141612 | 1,600 | 1.2 | Brushed | Vehicles, patio furniture | Compact and lightweight |
| RY141820 | 1,800 | 1.2 | Brushed | Decks, light patios | Onboard detergent tank |
| RY142022 | 2,000 | 1.2 | Brushed | Driveways, concrete | Turbo nozzle included |
| RY142300 | 2,300 | 1.2 | Brushed | Heavy stains, large surfaces | Highest electric PSI in lineup |
| RY803001 | 2,000 | 1.0 | Brushless | Extended residential use | Longer motor service life |
Brushless motor models run cooler and outlast brushed units because they eliminate carbon brush wear. For occasional residential jobs, brushed units perform reliably at lower cost. For weekly or extended sessions, the brushless model justifies its premium across multiple ownership seasons.
Assembly and First-Time Setup Done Correctly
Rushing the assembly phase causes leaking connections, pulsating pressure, and sessions that frustrate from the first trigger pull. Taking five minutes here prevents all of it.
Connecting the Water Supply Hose
Use a garden hose with a minimum 5/8-inch internal diameter for every connection. Smaller hoses restrict flow below the pump’s demand and cause cavitation, producing erratic output regardless of the machine’s rated PSI.
Thread the hose onto the water inlet by hand until snug, then add one quarter-turn with an adjustable wrench. Never overtighten, as excess force cracks the inlet housing on several Ryobi models.
Confirm there are no kinks anywhere between the tap and the machine inlet. A single tight kink reduces flow enough to trigger thermal shutdown within minutes of startup.
Assembling the Gun, Wand, and High-Pressure Hose
Pull the quick-connect collar backward, insert the male fitting fully into the socket, release the collar, and tug firmly to confirm the lock is fully engaged. Use this same procedure for connecting the high-pressure hose to both the pump outlet and the trigger gun.
Slide the wand extension into the gun body and rotate it until the locking tabs reach a definitive stop. A partially seated quick-connect fitting under operating pressure releases with dangerous force and creates an immediate pressure drop at the nozzle.
Priming the Pump Before Power On
With the supply hose connected and the tap fully open, squeeze and hold the trigger while the machine remains unplugged. Air and water will pulse out of the wand tip in short bursts.
Hold the trigger until a steady, continuous, air-free stream flows from the wand without interruption. Only then should you plug in the machine and switch it on.
Skipping this step causes pulsating output on the first trigger pull. Most beginners misdiagnose this as a pump defect. It is trapped air, and bleeding it takes less than 20 seconds every session.
Nozzle Selection: The Decision That Controls Every Result
No single variable impacts cleaning outcome and surface safety more than nozzle choice. Ryobi uses the industry-standard color-coded system, making correct selection fast once you understand the physics behind it.
How Spray Angle Controls Impact Force
A narrower spray angle concentrates the machine’s entire output energy into a smaller contact zone, dramatically increasing impact force on that spot. A wider angle spreads that same energy across a larger footprint, reducing impact while covering more area per pass.
Hard, heavily contaminated surfaces like concrete benefit from concentrated force. Delicate materials like wood and painted siding need the energy dispersed wide to avoid damage.
This is why surface type drives nozzle selection every time, not habit or personal preference.
Color Code Reference and Correct Surface Matching
| Nozzle Color | Angle | Compatible Surfaces | Recommended Distance |
|---|---|---|---|
| Red | 0 degrees | Rust stripping, stuck paint only | 12 to 18 inches, extreme caution |
| Yellow | 15 degrees | Bare concrete, heavy masonry stains | 8 to 12 inches |
| Green | 25 degrees | Driveways, patios, brick walkways | 10 to 16 inches |
| White | 40 degrees | Wood, siding, vehicles, boats | 18 to 24 inches |
| Black | 65 degrees | Soap and detergent application only | 12 to 18 inches |
For concrete driveways and paved patios, always start with the green 25-degree tip. Move to yellow only after confirming green leaves no surface etching on a test strip.
For wood decks, fences, and pergolas, the white 40-degree tip is the only acceptable choice. Narrower tips raise wood grain aggressively, leaving a furry surface texture that makes any subsequent staining or sealing work significantly harder.
When the Turbo Nozzle Outperforms Standard Tips
The turbo nozzle included with several Ryobi models spins a 0-degree stream in a circular oscillating pattern. It delivers narrow-stream penetrating force while covering broader surface area than any standard tip can manage.
On concrete and brick surfaces with heavy biological growth including moss, algae, and lichen, the turbo nozzle consistently outperforms the green and yellow tips. It handles deeply embedded organic contamination that standard wand passes leave behind.
It is not appropriate for wood, painted surfaces, vehicles, or any material requiring more than moderate standoff distance. On paved surfaces specifically, use it as your default replacement for the green tip on heavy-cleaning jobs.
Using the Ryobi Detergent System Effectively
Most users either skip soap entirely or apply it incorrectly and then wonder why results fall short. The detergent system on Ryobi units works well when operated correctly and adds little value when it is not.
How the Onboard Detergent Tank Operates
Models with an integrated tank mix cleaning solution directly into the water stream at the pump outlet. Fill the tank with properly diluted solution per the product label, open the tank valve, and the machine meters detergent automatically during operation.
Because downstream injection delivers detergent at lower concentration than professional-grade systems, dwell time is essential to compensate. Apply soap from the bottom of vertical surfaces upward to prevent streaking from runoff on uncleaned areas below.
Allow 3 to 5 minutes of contact time before rinsing. Never let the solution dry on any surface.
Applying Detergent Through the Black Soap Nozzle
On models without an integrated tank, the black 65-degree tip activates a siphon tube that draws detergent from an external container placed near the machine. This mechanism only works at low-pressure output.
High-pressure flow prevents the venturi effect that activates the siphon pickup. Fitting the black tip automatically opens a low-pressure pathway, and detergent draws up through the tube as you squeeze the trigger.
Never apply chemical solution through any tip other than the black soap nozzle. Concentrated cleaner applied at high pressure aerosolizes into fine droplets that can strip surface coatings and create chemical exposure hazards.
Detergent Products That Are Safe for Ryobi Pumps
Simple Green All-Purpose cleaner, dedicated deck brighteners, exterior house wash concentrates, and pressure washer rated car wash soaps all work safely with Ryobi pump seals and O-ring materials.
Deck brightener products containing mild oxalic acid lift weathering greyness from wood surfaces effectively before staining or sealing. Exterior house wash concentrates address mildew, algae, and atmospheric grime on siding efficiently.
Avoid undiluted bleach, acetone, petroleum solvents, and abrasive compounds in any Ryobi pump system. These chemicals degrade internal seals and produce leaks and reduced output within a short period of continued exposure.
Operating Technique That Delivers Consistent Results
Understanding how to use Ryobi electric pressure washer equipment in real-world conditions comes down to three variables: wand movement speed, overlap pattern, and standoff distance. Experienced users control these instinctively. Beginners need to apply them deliberately until they become automatic.
Movement Speed, Overlap, and Standoff Distance
Work in smooth, consistent sweeping strokes with approximately 50 percent overlap between adjacent passes. Moving too fast leaves grime residue and visible streaking on the surface. Moving too slowly concentrates pressure and risks etching, grain raising, or paint removal depending on the material.
Standoff distance by surface type: 8 to 12 inches for bare concrete with the yellow tip, 12 to 18 inches for sealed concrete with the green tip, 18 to 24 inches for wood and all painted surfaces with the white tip, and a minimum 20 to 24 inches for vehicle paint.
Always test a small inconspicuous strip before committing to a full cleaning pass on any new surface. This 30-second check prevents the most common cause of irreversible pressure washing damage.
Working Direction and Managing Surface Edges
On walls, fences, and all vertical siding, always work from the top downward. This carries loosened soil and detergent downward away from already-cleaned areas, preventing streak patterns from dirty water running back over clean sections.
On horizontal surfaces like driveways and decks, work in parallel passes from one end to the other. Angle the spray so loosened debris exits off the surface edge rather than recirculating back over areas you have already cleaned.
At corners and joints, angle the spray at approximately 45 degrees rather than directing it perpendicular into the seam. Perpendicular pressure into mortar joints, window frame seams, and siding joints drives water into gaps and causes interior moisture infiltration over time.
Surface-Specific Adjustments Every User Should Know
Vinyl siding and stucco belong in the white tip category at 20 to 24 inches of standoff distance. Never aim the spray upward under lapped siding panels. Upward spray forces water behind the cladding and into wall cavities, causing concealed moisture damage that does not appear immediately.
For vehicles, rinse from the roof downward to remove loose surface debris before applying soap. Apply car wash solution through the soap port, allow 2 to 3 minutes of dwell time, then rinse systematically from top to bottom.
Avoid directing any spray at convertible soft tops, door weatherstripping, antenna mounts, and any exposed wiring connections that are not fully sealed against water entry.
Troubleshooting Common Ryobi Performance Problems
Low Pressure Despite the Motor Running Normally
Work through four checks in sequence before assuming pump failure. First, clear the inlet filter and confirm the supply tap is fully open with no hose kinks anywhere along the line.
Second, inspect the nozzle tip for wear or partial blockage. A worn tip with an enlarged orifice allows more flow volume at reduced velocity, producing soft output regardless of pump condition.
Third, check all quick-connect fittings for worn O-rings causing internal bypass. Fourth, confirm the unloader valve is not stuck partially open, which recirculates flow back to the inlet instead of directing it out through the wand.
Pulsating Output That Will Not Stabilize
Pulsating pressure that cycles rhythmically between strong and weak indicates air entering the water supply side or insufficient flow rate from the tap. Reconnect all inlet fittings, confirm the supply hose is full diameter with zero kinks, and reprime the system through the trigger.
If pulsating continues, the machine is drawing water faster than the tap can deliver. Place an intermediate storage container between the tap and the machine inlet to buffer the supply flow.
This issue is particularly common when using long runs of undersized garden hose or when supply pressure at the tap is below 20 PSI at the point of connection.
Water Leaking from Connections and Joints
Leaks at quick-connect fittings almost always trace to a damaged or missing O-ring inside the coupler body. Inspect every connection point and replace any O-ring showing cracking, flat spots, swelling, or loss of round cross-section.
Ryobi-compatible O-ring replacement sets cost only a few dollars and resolve the majority of connection leaks immediately after installation. For the thread-type connection at the water inlet, apply thread seal tape clockwise on the male threads before reconnecting.
If the leak originates from beneath the pump body housing during operation, internal pump seals require professional service rather than a DIY fix.
Why Is My Electric Pressure Washer Not Turning On?
Can You Use Extension Cord With Electric Pressure Washer?
Maintenance, Storage, and Long-Term Care
Post-Use Routine That Takes Under Three Minutes
Switch off and unplug the machine immediately after the final pass. Disconnect the supply hose and squeeze the trigger to release residual pressure from the wand and hose interior.
Remove the nozzle tip and run the machine briefly to flush any detergent residue from internal pump passages. Wipe the exterior housing with a damp cloth to remove cleaning chemical residue.
Inspect O-rings at all connection points and replace any that appear compromised. Coil the high-pressure hose without sharp kinks and store nozzle tips together in the included holder for easy access next session.
Winterizing to Prevent Freeze Damage
Residual water inside the pump freezes during cold storage and expands with enough force to crack the pump body and split internal seals permanently. After the final session of the season, pump pump saver solution through the inlet until it exits consistently from the wand.
This confirms the entire pump housing interior is coated with antifreeze and lubricating compound. Store the unit in a location that remains above freezing throughout the entire storage period.
In spring, flush fresh water through the system for 30 seconds before the first operational use. This clears any residual pump saver compound from the passages before cleaning begins.
Frequently Asked Questions
How do I attach nozzle tips to a Ryobi pressure washer?
Pull the outer collar of the quick-connect socket backward, insert the male nozzle fitting fully into the socket, then release the collar. Pull the connected tip outward firmly to confirm the locking mechanism is fully engaged before operating the machine.
To remove a tip, squeeze the trigger first to fully depressurize the wand. Then pull the collar backward and withdraw the tip cleanly.
Never swap tips while the machine is running or while the system remains under pressure. A pressurized fitting releases with significant force and can propel the tip at dangerous speed toward nearby surfaces or people.
Why is there no pressure on the first trigger pull?
Absent or very weak pressure on the first pull is almost always caused by trapped air inside the pump and hose assembly. Unplug the machine, open the supply tap fully, and squeeze the trigger repeatedly to bleed air from the system.
Hold the trigger until a steady, continuous, uninterrupted stream flows from the wand tip. Plug in and power on only after this condition is confirmed.
Electric pressure washer pumps cannot self-prime efficiently while running under electrical load. Air in the system causes cavitation that reduces both output pressure and pump lifespan when it persists across multiple sessions.
What detergent is safe to use in a Ryobi pressure washer?
Use only products specifically labeled as pressure washer compatible. Simple Green All-Purpose cleaner, exterior house wash concentrates, pressure washer rated car wash soaps, deck brighteners, and concrete degreasers in machine-safe formulations are all appropriate choices.
These products work correctly with downstream injection systems, rinse completely without residue, and avoid attacking rubber seal and O-ring materials inside the pump assembly.
Avoid household dish soap not rated for machine use, undiluted bleach, solvent-based cleaners, and abrasive compounds. Incompatible chemicals cause accelerated seal degradation, producing pump leaks and reduced output within a short period of continued exposure.
Can I use a Ryobi electric pressure washer to wash my car?
Yes. Ryobi electric models are well-suited for vehicle washing because the pressure range delivers effective cleaning force while remaining controllable enough to protect automotive paint and trim surfaces.
Use the white 40-degree nozzle exclusively on all vehicle surfaces and maintain a minimum 18-inch standoff distance from the paint. Rinse from roof to rocker panels to remove loose surface debris before applying any soap.
Allow the car wash solution 2 to 3 minutes of dwell time after application, then rinse systematically from top to bottom. Avoid directing spray at convertible tops, door weatherstripping, antenna mounts, and any exposed sensor or wiring connections.
Why does my Ryobi pressure washer keep shutting off during use?
A machine that starts then shuts off shortly after is experiencing thermal overload shutdown. The thermal cutoff protects motor windings by cutting power automatically when internal temperature exceeds a safe threshold.
Common causes include insufficient water supply from a kinked hose or partially closed tap, running the pump dry without water flow, operating in high ambient temperatures, or exceeding the rated continuous duty cycle.
Allow 30 minutes of full cooling before restarting. Confirm the water supply is completely unrestricted before powering on again. If shutdown recurs immediately after restart, inspect for a seized pump component before continuing use.
How far should I hold the wand from different surfaces?
Standoff distance varies based on both the surface material and the nozzle tip in use. Bare uncoated concrete accepts 8 to 12 inches with the yellow or green tip for maximum cleaning impact.
Sealed or stamped concrete needs 12 to 18 inches with the green tip to protect the surface coating from damage. All wood surfaces including decking and fencing require 18 to 24 inches with the white 40-degree tip without exception.
Vehicle paint and fiberglass surfaces need a minimum 18 to 20 inches with the white tip. Roof materials and window screens should be cleaned at 24 to 36 inches using the widest available nozzle.
How do I know when O-rings need replacing?
Inspect O-rings at every connection point at the start of each season and after any session where leaking was observed at any fitting. Replace immediately if you see visible cracking across the ring surface or permanent compression flat spots where the round cross-section has deformed.
Also replace any O-ring that shows chemical swelling, shrinkage, or loss of natural rubber flexibility when pressed lightly between your fingers. These are signs the material has degraded beyond reliable sealing performance.
Seeping water from a quick-connect joint during operation almost always indicates a compromised O-ring rather than a failed coupler body. Ryobi-compatible replacement sets are inexpensive and widely available through the manufacturer’s parts portal.
Can I connect my Ryobi pressure washer to a rain barrel or storage tank?
You can connect it to a storage tank, but the supply configuration requires careful attention to sustained flow rate. The machine needs continuous supply flow at or above its rated GPM to operate without cavitation damage.
Most gravity-fed rain barrel setups cannot reliably deliver the required 1.2 GPM under active working conditions. Elevating the barrel increases gravity head and helps on lower-output models but rarely provides full flow reliability for extended sessions.
A small booster pump positioned between the storage tank and the machine inlet resolves this limitation effectively. Always verify the supply source sustains required flow before relying on it for any extended cleaning session.
What is the correct winterization process for a Ryobi pressure washer?
After the final session of the season, flush the pump with fresh water for 30 to 60 seconds to clear all detergent residue from internal passages. Disconnect the supply hose and squeeze the trigger to release all residual pressure from the wand and hose.
With the machine off and unplugged, pump pump saver antifreeze solution through the inlet until fluid exits consistently from the wand tip. This confirms full interior protection against freeze expansion.
Store the unit in a location that remains above freezing throughout the entire storage period. In spring, flush fresh water through the system for 30 seconds before the first operational use of the new season.
Conclusion
Knowing how to use Ryobi electric pressure washer equipment correctly starts with five fundamentals: prime the pump before powering on, match the nozzle to the surface, hold the correct standoff distance, let detergent dwell before rinsing, and winterize the pump at season end.
Every common performance problem traces back to one of these five areas. The white 40-degree tip handles most residential surfaces safely. The turbo nozzle handles heavy concrete contamination efficiently.
Proper pump saver application each season prevents the majority of spring startup failures. Follow these principles consistently and the machine delivers reliable, professional-level results across years of regular use.