
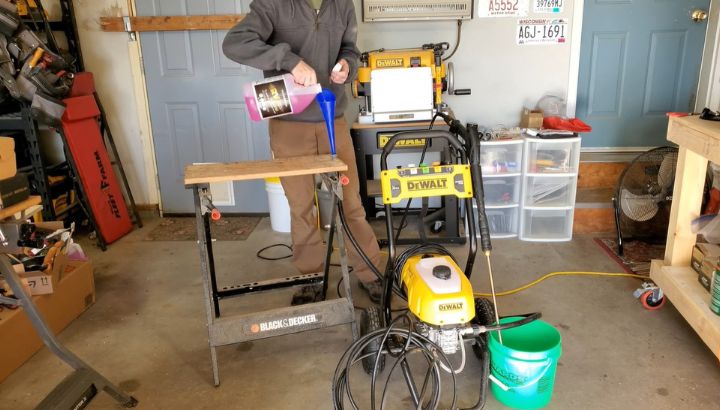
To winterize an electric pressure washer, flush the pump with clean water, disconnect all hoses, squeeze the trigger to release residual pressure, then pump antifreeze pump saver solution through the inlet until it exits the wand. Never store a pressure washer with water inside the pump housing.Trapped water freezes, expands, and cracks internal seals and pump components permanently. Complete winterization takes under 10 minutes and prevents the majority of spring startup failures that cost more to repair than the machine itself.
Skipping winterization is the single most expensive mistake electric pressure washer owners make. One freeze cycle inside an unprotected pump can split seals, crack the pump housing, and destroy the unloader valve beyond repair.
This guide on how to winterize electric pressure washer units covers every step, every product, every common mistake, and every surface-specific consideration so your machine starts perfectly when spring cleaning season arrives.
Why Winterization Is Non-Negotiable for Electric Pressure Washers
Water expands by roughly 9 percent when it freezes. Inside a sealed pump housing with no room for that expansion, the force generated is enough to fracture cast aluminum, split rubber seals, and crack valve seats that are not user-serviceable.
Most pump damage from freezing is not immediately visible on the outside. The machine may look perfectly intact in storage. The damage only reveals itself when you power it on in spring and get zero pressure, visible leaks from the pump body, or a motor that hums without the pump turning.
Repair costs for freeze-damaged pumps routinely exceed the value of budget-tier units entirely. On mid-range and premium machines, professional pump replacement runs between $80 and $200 in parts alone before any labor cost.
What Actually Happens Inside a Frozen Pump
The pump housing contains internal passages, check valves, and seal cavities that hold residual water after every use. Even after draining the hose and wand, water remains trapped in these tight internal spaces.
When ambient temperature drops below 32 degrees Fahrenheit, that trapped water freezes and expands outward in every direction. The O-ring seals compress and crack under that pressure. The valve seats warp or fracture.
On reassembly in spring, these damaged components cannot hold pressure. The result is a machine that runs but produces drastically reduced output, leaks from the pump body, or fails to start entirely because internal components have seized.
Electric vs. Gas: Different Vulnerabilities in Cold Storage
Electric and gas pressure washers share freeze vulnerability in the pump, but differ significantly in every other cold-storage consideration. Understanding the difference helps prioritize your winterization steps correctly.
| Factor | Electric Pressure Washer | Gas Pressure Washer |
|---|---|---|
| Pump freeze risk | High, identical to gas | High, identical to electric |
| Fuel system winterization | Not applicable | Required (stabilizer or drain) |
| Oil change needed | Not applicable | Recommended annually |
| Spark plug service | Not applicable | Recommended before storage |
| Battery concerns | Not applicable | Some models have battery ignition |
| Motor corrosion risk | Moderate in humid storage | Low due to sealed components |
| Carburetor gumming | Not applicable | Major risk without fuel stabilizer |
| Overall winterization complexity | Low to moderate | Moderate to high |
Electric models require less overall winterization work than gas units. But they are equally vulnerable to pump freeze damage, and that vulnerability is the one that costs the most to ignore.
Tools and Supplies You Need Before Starting
Gathering everything before you begin means the process flows in one continuous sequence without stopping to search for products or tools mid-way.
Essential Winterization Products
Pump saver solution is the single most important product for electric pressure washer winterization. Products like Briggs and Stratton Pump Saver, AR Pump Protector, and Simpson Pump Armor fill the pump interior with an antifreeze and lubricating compound that prevents freeze damage and keeps internal seals pliable throughout the storage period.
These products come in pressurized aerosol cans or liquid bottles. The aerosol format is the most convenient for single-person use because it delivers solution directly into the inlet port without requiring a separate pump mechanism.
Never substitute automotive antifreeze for dedicated pump saver solution. Automotive antifreeze contains glycol compounds that attack rubber seals and O-ring materials inside pressure washer pumps specifically.
Tools Required for the Full Process
You need only basic items that most homeowners already have on hand. An adjustable wrench handles the garden hose disconnection at the inlet. A flat-head screwdriver may be needed to remove the inlet filter housing on some models.
Clean dry rags are essential for wiping connection points, the pump exterior, and the trigger gun body before storage. A storage container or zip-lock bag keeps nozzle tips together and protected from corrosion during the storage period.
For machines with a foam cannon or downstream soap injection system, a small bucket of clean water is useful for flushing detergent residue from the chemical lines before applying pump saver.
Step-by-Step Winterization Process
This is the complete sequence for how to winterize electric pressure washer units correctly from start to finish. Follow every step in order for full protection.
Step 1: Final Flush With Clean Water
Before doing anything else, run the machine for 60 to 90 seconds with a clean water supply and no detergent in the system. This flushes any remaining soap, mineral deposits, or debris from the pump, hose, and wand interior.
Switch off the machine and disconnect it from the power outlet completely. Never work on any component while the machine remains plugged in.
Squeeze the trigger gun several times to release all residual high pressure from the wand and hose interior. Water will continue to flow out briefly even after the machine is off. Allow it to drain fully.
Step 2: Disconnect and Drain All Hoses
Disconnect the garden hose from the water inlet port by turning it counterclockwise. Hold the inlet downward and allow any remaining water to drain out fully by gravity.
Disconnect the high-pressure hose from the pump outlet using the quick-connect release. Hold both ends of the hose upward at the center to form a U-shape, then lower each end alternately to encourage water to drain from both directions.
Remove the spray gun and wand from the high-pressure hose. Shake each component individually to remove as much residual water as possible before storage.
Step 3: Remove and Clean the Inlet Filter
Locate the inlet filter at the water inlet port. On most models it unscrews or pulls out with needle-nose pliers. Rinse it under clean tap water and use a soft brush to remove any mineral scale or sediment deposits.
Inspect the filter mesh for physical damage. A torn or deformed mesh screen allows sediment to pass directly into the pump during next season’s first use. Replace it if any damage is visible.
Allow the filter to dry completely before reinstalling it. Trapping moisture behind a sealed filter screen during storage encourages corrosion at the inlet port on machines with metal inlet housings.
Step 4: Apply Pump Saver Solution
This is the most critical step in the entire winterization sequence. With the machine disconnected from power and all hoses removed, connect the pump saver product directly to the water inlet port.
For aerosol pump saver products, insert the nozzle directly into the inlet port and depress the valve for 3 to 5 seconds. Water-mixed foam will appear at the wand outlet end, confirming the solution has traveled through the entire pump interior.
For liquid pump saver products, connect the bottle’s outlet tube to the inlet, then briefly start the machine to draw the solution through the pump. Switch off immediately once solution exits the wand. The pump interior is now fully coated.
Step 5: Prepare the Hose, Gun, and Wand for Storage
Coil the high-pressure hose in smooth, wide loops without sharp kinks. A kinked coil stresses the inner braid layer over the storage period and causes cracks that appear as leaks during the first pressurized use in spring.
Engage the trigger safety lock on the trigger gun before storing it. This prevents accidental trigger actuation during handling and protects the internal valve mechanism from being held partially open during storage.
Store all five nozzle tips together in the included nozzle holder or a clearly labeled zip-lock bag. Nozzle orifices corrode if stored loose in a tool drawer where moisture and dissimilar metals make contact during the off-season.
Step 6: Final Inspection and Storage Location
Wipe the entire machine exterior with a dry cloth, paying particular attention to the motor housing vents, the pump body, and all connection ports. Moisture trapped against metal surfaces during storage causes corrosion that accelerates wear on the next season’s first use.
Inspect all O-ring seals at every quick-connect fitting and connection point. Replace any O-ring that shows cracking, flat spots, or loss of elasticity before storing the machine. Fresh O-rings cost pennies and ensure leak-free connections on spring startup.
Store the complete machine in a location that remains consistently above 32 degrees Fahrenheit throughout the entire storage period. A heated garage, basement, or interior utility space all meet this requirement. An unheated shed or outdoor storage box does not.
Winterization for Specific Ryobi, Greenworks, and Sun Joe Models
Different brands use slightly different pump configurations and inlet systems. Knowing the model-specific variations ensures pump saver solution reaches all internal passages correctly.
Ryobi Electric Models
Ryobi electric pressure washers use a standard threaded inlet port compatible with both aerosol and liquid pump saver products without adapters. The onboard detergent tank on models like the RY141820 should be emptied and rinsed with clean water before applying pump saver.
Leave the detergent tank valve open during the pump saver application step. This allows solution to reach the downstream chemical injection passages that connect to the tank, preventing soap residue from hardening inside those channels during storage.
Sun Joe and Greenworks Models
Sun Joe and Greenworks models generally use the same universal M22 or quick-connect inlet port configurations that accept standard pump saver products directly. Some Sun Joe models include a transparent water inlet filter housing that allows visual confirmation of pump saver solution passing through the inlet path.
On Greenworks models with a built-in hose reel, extend and retract the hose fully before draining to ensure no trapped pockets of water remain in the reel mechanism. Water pooled in a coiled reel at sub-zero temperatures can fracture the reel housing.
Karcher Models
Karcher electric models often include a proprietary quick-connect system at the trigger gun and hose connections. These require a full trigger pull after disconnecting the supply hose to release pressure before the quick-connect fittings will disengage.
Karcher models with an integrated detergent suction system should have the suction tube removed from the detergent container and placed in a small cup of clean water. Running the machine briefly draws clean water through the suction passage and flushes any remaining chemical residue before pump saver application.
Common Winterization Mistakes That Cause Spring Damage
Relying on Drainage Alone Without Pump Saver
Many users disconnect the hoses, tip the machine upside down to drain it, and consider winterization complete. Gravity drainage removes most free-standing water but leaves a film of moisture coating every internal surface, every seal cavity, and every valve seat.
That residual moisture film is enough to cause corrosion on metal components and freeze damage in severe cold. Pump saver solution displaces this residual moisture, replaces it with antifreeze compound, and simultaneously coats internal seals with lubricant that prevents them from drying and cracking during months of dormancy.
Storing in an Unheated Space After Incomplete Draining
An unheated garage, garden shed, or outdoor storage box regularly reaches temperatures well below freezing in most northern climates. Even one freeze cycle with any residual water present causes the damage described in the first section of this guide.
If heated storage is not available, apply pump saver solution and then wrap the machine body in an insulating blanket or store it inside a foam-insulated container. This is not a permanent solution but provides meaningful protection against moderate temperature drops when heated storage is genuinely unavailable.
Forgetting the Detergent System
The downstream chemical injection system, the onboard tank, and the siphon tube assembly all contain residual cleaning solution after the last session. Cleaning solution left in these passages during storage can harden into deposits that block the chemical pathway entirely.
Flush the entire detergent system with clean water before applying pump saver. On tank-equipped models, remove the tank, rinse it thoroughly, and dry it before reinstalling. On siphon tube models, place the tube in clean water and run the machine briefly to flush the channel completely.
Spring Startup After Winter Storage
Proper spring startup protects the pump on the first use of the new season and confirms winterization was successful before committing to a full cleaning session.
Flushing Pump Saver Before First Use
Connect the garden hose and open the supply tap fully. With the machine still unplugged, squeeze the trigger and allow fresh water to flow through the pump and wand for 30 to 60 seconds.
This flushes residual pump saver solution from the internal passages before the pump operates under load. Pump saver compounds are non-toxic but can produce slight foam at the wand tip during the first pressurized moments of spring operation if not flushed out first.
Inspecting Components Before Reconnecting
Before assembling the full machine for spring use, inspect every O-ring, every quick-connect fitting, and the inlet filter mesh. Winter storage is a dry period that reveals which seals had already begun degrading before storage.
Replace any O-ring that remained compressed against a fitting face throughout storage. Extended compression without lubrication causes permanent flat spots that prevent a proper pressure seal during operation.
Test the GFCI outlet the machine will be plugged into using the test and reset buttons before connecting the power cord. Outdoor outlets exposed to winter moisture sometimes develop internal faults during the off-season that appear only when the circuit is loaded.
Complete Winterization Reference Table
| Step | Action Required | Product Needed | Time Required |
|---|---|---|---|
| 1 | Final flush with clean water | Garden hose, water supply | 2 minutes |
| 2 | Disconnect and drain all hoses | Adjustable wrench | 3 minutes |
| 3 | Remove and clean inlet filter | Needle-nose pliers, soft brush | 2 minutes |
| 4 | Apply pump saver to inlet port | Pump saver solution (aerosol or liquid) | 1 to 2 minutes |
| 5 | Prepare hose, gun, wand for storage | Dry cloth, nozzle storage bag | 3 minutes |
| 6 | Final inspection and seal check | Replacement O-rings if needed | 2 minutes |
| 7 | Move to heated storage location | Insulating wrap if needed | 1 minute |
Frequently Asked Questions
Do I really need pump saver or can I just drain the water out?
Draining alone is not sufficient protection for cold storage. Gravity removes free-standing water from the hose and wand, but a residual moisture film remains coating every internal pump surface, seal cavity, and valve seat regardless of how long you drain it.
That moisture film is enough to cause freeze damage in sustained cold temperatures and corrosion on metal components during months of storage.
Pump saver solution displaces that residual moisture completely, replaces it with antifreeze compound, and coats all internal seals with lubricant. The product costs under $10 and takes two minutes to apply. The repair it prevents can cost over $150.
What is the best pump saver product for electric pressure washers?
Briggs and Stratton Pump Saver, AR Pump Protector, and Simpson Pump Armor are all well-regarded products compatible with the majority of consumer electric pressure washer pump materials. All three are available at major home improvement retailers and online.
The aerosol format is the most convenient for single-person use. It delivers solution directly into the inlet port in seconds without requiring a separate pumping mechanism or secondary tubing.
Never use automotive antifreeze as a substitute. Glycol-based antifreeze attacks the rubber seals and synthetic O-ring materials inside pressure washer pumps and causes the exact type of seal degradation you are trying to prevent.
At what temperature does a pressure washer pump freeze and get damaged?
Pump damage begins at 32 degrees Fahrenheit, the standard freezing point of water at atmospheric pressure. However, the actual damage threshold depends on how much residual water is present and how long the pump remains at or below that temperature.
A single night below freezing with a fully saturated pump interior can cause complete seal failure. Extended storage at temperatures between 25 and 32 degrees Fahrenheit causes gradual damage that accumulates across the storage period.
Any storage situation where temperatures will fall below 40 degrees Fahrenheit at any point warrants full pump saver protection. The margin of safety is worth maintaining.
Can I winterize my pressure washer without pump saver using rubbing alcohol?
Rubbing alcohol, also known as isopropyl alcohol, will displace residual water in the pump and has a freezing point well below 32 degrees Fahrenheit. In a genuine emergency where pump saver is unavailable, it provides better protection than water alone.
However, isopropyl alcohol is not formulated to lubricate pump seals or protect metal surfaces from corrosion the way dedicated pump saver compounds are. Extended contact with isopropyl alcohol can dry out rubber O-ring materials and accelerate seal degradation over a full winter storage period.
Use it only as a temporary emergency measure and apply proper pump saver solution as soon as it becomes available.
How do I winterize the detergent system on my pressure washer?
Empty the onboard detergent tank completely and rinse it with clean water before storage. Leave the tank valve open during the pump saver application step so solution reaches the downstream injection passages connected to the tank outlet.
For siphon tube detergent systems, remove the tube from the detergent container and place it in a cup of clean water. Run the machine briefly to draw clean water through the siphon passage and flush any remaining chemical residue.
Cleaning solution left in detergent passages during storage hardens into mineral and surfactant deposits that block the chemical pathway, requiring manual cleaning or full component replacement before the system functions again in spring.
Is it okay to store my pressure washer in a shed that gets below freezing?
An unheated shed that reaches freezing temperatures is not a safe storage location for a pressure washer unless pump saver solution has been fully applied and confirmed. Even with pump saver applied, sustained temperatures below 0 degrees Fahrenheit exceed the protection range of most standard pump saver compounds.
If heated storage is not available, apply pump saver and then store the machine inside an insulated container or wrap the pump body in insulating material to buffer against extreme temperature drops.
The safest option is always a heated interior space such as a basement, attached garage with heating, or conditioned utility room where temperatures remain consistently above freezing throughout winter.
Do I need to change anything about the high-pressure hose before storage?
The high-pressure hose does not require any chemical treatment for winter storage. The key concerns are coiling it correctly and inspecting the inner braid for existing damage before putting it away for months.
Coil the hose in wide, smooth loops without any sharp kinks or tight bends. Kinks that remain under tension throughout a long storage period stress the inner braid layer and cause cracks that appear as leaks during the first pressurized use in spring.
Inspect both quick-connect ends for O-ring condition and confirm the coupler collars move freely. Stiff or corroded quick-connect collars that were functional before storage sometimes seize further during months of dormancy.
How long does pump saver protection actually last in storage?
Most pump saver products provide effective freeze and corrosion protection for 12 months of storage under normal conditions. This means a machine properly winterized at the end of one cleaning season is protected through a full calendar year.
If the machine remains in storage for more than 12 months, apply a fresh treatment before startup rather than assuming the original application is still providing full protection.
Products kept in storage for extended periods should also have their O-rings inspected and replaced if needed before the first use, as rubber compounds degrade over long dormancy periods regardless of pump saver application.
What should I check on the first spring startup after winter storage?
Before powering on, inspect every O-ring seal at all connection points and replace any that show cracking, flat spots, or stiffness. Reinstall the cleaned inlet filter. Connect the garden hose and flush fresh water through the pump for 60 seconds with the machine unplugged to clear residual pump saver compound.
Test the GFCI outlet using its test and reset buttons before plugging in the power cord. Check the power cord itself for any cracking or insulation damage that developed during cold storage.
Power on, squeeze the trigger, and observe output immediately. Normal full pressure on the first trigger pull confirms successful winterization and spring readiness.
Conclusion
Winterizing an electric pressure washer correctly comes down to four non-negotiable actions: flush with clean water, disconnect and drain all hoses, apply pump saver solution through the inlet until it exits the wand, and store the machine in a heated location above freezing.
Every spring startup failure, cracked pump body, and leaking seal assembly traces back to one of these steps being skipped. Pump saver solution is the single most important product in the entire process.
Spend 10 minutes on proper winterization now and your machine starts reliably next season. Skip it once and a single freeze cycle can turn a functioning pressure washer into an expensive repair or replacement.