
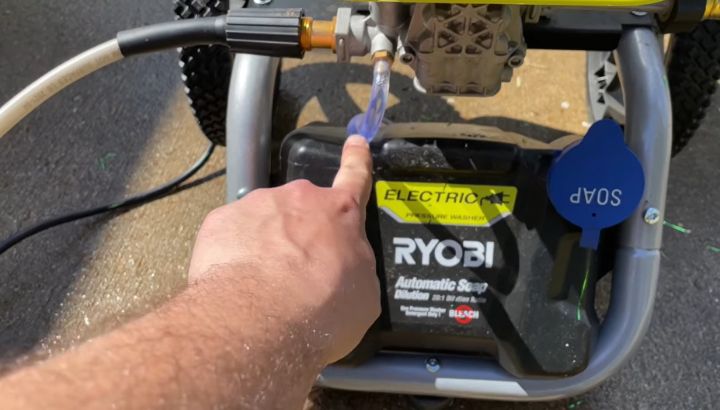
Fill the Ryobi detergent tank with diluted pressure washer soap, attach the black 65-degree soap nozzle, and squeeze the trigger to apply low-pressure foam across the surface. Never apply soap through any nozzle other than the black tip, as high pressure prevents the downstream injection system from drawing detergent correctly. Allow 3 to 5 minutes of dwell time before switching to a rinse nozzle and clearing the surface from top to bottom.
Most Ryobi pressure washer owners use their machine for months without ever activating the soap system correctly. The detergent tank fills, the trigger gets squeezed, and nothing but water comes out.
Understanding how to use soap with Ryobi electric pressure washer models correctly requires knowing which nozzle activates the system, how downstream injection works physically, what dilution ratios actually produce results, and which soaps protect the pump while cleaning effectively.
How the Ryobi Soap Delivery System Actually Works
Ryobi electric pressure washers use a downstream soap injection system rather than the upstream injection found on professional gas-powered units. Understanding this distinction explains every rule about soap application on these machines.
Downstream injection draws soap into the water stream after the pump, not before it. This means the soap never contacts the high-pressure pump components, which protects internal seals from chemical degradation. It also means the injection only functions correctly at low pressure output.
When you fit the black 65-degree nozzle and squeeze the trigger, the reduced flow velocity through the nozzle creates a venturi effect at the soap pickup point. This low-pressure differential draws soap from the tank up through the pickup tube and into the water stream automatically.
Why High-Pressure Nozzles Prevent Soap from Flowing
Fitting any nozzle other than the black soap tip eliminates the venturi effect entirely. High-pressure flow through narrow-angle nozzles maintains full system pressure at the injection point, which prevents the pressure differential needed to draw soap from the tank.
This is the most common reason Ryobi users report that their soap system does not work. The machine is functioning correctly. The nozzle selection is wrong. Switching to the black 65-degree tip immediately resolves the issue in nearly every case.
The black tip is not a rinse nozzle. It is an application-only nozzle designed exclusively for soap delivery at low effective pressure. Rinsing through it is ineffective and leaves soap residue on the surface.
The Detergent Tank: Location, Capacity, and Fill Access
Most Ryobi electric models include an onboard detergent tank integrated into the machine body, typically positioned on the side or rear of the unit near the pump housing. Tank capacity varies by model but generally holds 0.5 to 1 liter of diluted soap solution.
The tank has a removable cap or lid that provides fill access. On some models, a flow control valve on the tank body allows the user to open or close the soap supply line independently from the trigger operation.
Confirm the flow control valve is in the open position before attempting soap application. A valve left in the closed position from the previous session prevents soap from reaching the pickup tube regardless of nozzle selection or trigger technique.
Selecting the Right Soap for Ryobi Pressure Washer Use
Soap selection affects both cleaning results and machine longevity. Not every cleaning product is compatible with the materials inside the Ryobi downstream injection system, and using incompatible products causes seal degradation that develops gradually across multiple sessions.
Soaps That Are Safe and Effective
Products specifically labeled as pressure washer compatible are the correct starting point. These formulations are designed to work with downstream injection venturi systems, rinse completely without residue, and avoid attacking rubber and synthetic seal materials inside the injection pathway.
Simple Green All-Purpose Cleaner diluted to the manufacturer’s recommended ratio is one of the most widely used and consistently effective options for general outdoor surface cleaning. It handles grime, mildew, and atmospheric deposits effectively on siding, decks, and concrete without harming pump components.
Dedicated car wash concentrates from brands including Meguiar’s and Chemical Guys work correctly through the Ryobi system for vehicle washing. These soaps are formulated to lubricate painted surfaces during washing, reducing the risk of swirl marks introduced by any remaining mechanical contact during the rinse phase.
Soaps That Damage the System and Should Never Be Used
Undiluted bleach concentrations above 3 percent attack nitrile and rubber seal materials in the injection pathway and cause progressive leak development. If a bleach solution is required for mold or algae treatment, use only the manufacturer’s maximum recommended dilution and flush the system thoroughly with clean water immediately after application.
Standard dish soap not rated for pressure washer use creates excess suds that persist through the injection system, clog the pickup tube over time, and leave residue films on cleaned surfaces that attract dirt more rapidly than a clean surface would.
Acetone, petroleum-based solvents, and abrasive cleaning compounds should never enter the detergent tank under any circumstances. These products destroy O-ring seals within minutes of contact and require complete pump disassembly to address the resulting damage.
Dilution Ratios That Produce Real Results
The Ryobi downstream injection system dilutes soap further as it draws it into the water stream. This means the soap in the tank is already diluted when it reaches the surface, and the dilution inside the tank must account for this secondary dilution to maintain effective cleaning concentration.
For general outdoor surface cleaning, a starting dilution of 1 part concentrated soap to 5 to 10 parts water in the tank delivers effective results. For heavily soiled surfaces with grease or biological contamination, reducing to 1 part soap to 3 parts water in the tank increases effective surface concentration.
For vehicle washing where paint protection is the priority, follow the specific soap manufacturer’s dilution recommendation on the product label and reduce by 20 to 30 percent to account for the secondary dilution inside the injection system.
Step-by-Step Soap Application Process on Ryobi Models
This is the complete sequence for how to use soap with Ryobi electric pressure washer equipment correctly from tank fill to final rinse. Following every step in order prevents the common application errors that result in poor cleaning performance.
Step 1: Pre-Rinse the Surface Before Applying Soap
Before filling the tank with soap, rinse the target surface with clean water using the green 25-degree or white 40-degree nozzle. This removes loose dirt, dust, and dry debris that would otherwise mix with the soap solution and reduce its effectiveness against bonded contamination.
Pre-rinsing also wets the surface so the soap applied in the next step does not begin drying immediately on contact. A dry surface in warm conditions can cause soap to dry before dwell time is complete, leaving residue that creates additional cleaning work during the rinse phase.
Step 2: Fill and Prepare the Detergent Tank
Remove the tank cap and fill with the correctly diluted soap solution. Fill to approximately 80 percent of tank capacity to prevent overflow when the cap is replaced and the tank moves during operation.
Replace the cap and confirm it is fully seated. A loosely capped tank allows soap to slosh out during operation and draws air through the gap rather than soap up the pickup tube, causing inconsistent foam output during application.
Open the flow control valve on the tank if your Ryobi model includes one. Confirm it moves freely and is in the fully open position before attaching the black nozzle tip.
Step 3: Attach the Black 65-Degree Soap Nozzle
Remove whatever nozzle is currently installed on the wand by pulling the quick-connect collar backward and withdrawing the tip. Install the black 65-degree soap tip by inserting the male fitting into the quick-connect socket and releasing the collar until it clicks.
Tug the installed tip outward firmly to confirm the quick-connect lock is fully engaged before operating. A partially seated tip releases under operating pressure and can become a projectile at close range.
Do not power the machine on until the black tip is confirmed locked in position and the water supply is fully open and flowing.
Step 4: Apply Soap from Bottom to Top
Power on the machine and begin applying soap starting at the bottom of vertical surfaces and working upward. This application direction prevents soap runoff from flowing across areas that have not yet received coverage, which causes streaking on the final cleaned surface.
Hold the wand approximately 12 to 18 inches from the surface for soap application. Closer distances deposit more concentrated soap on specific areas. Further distances provide more even low-pressure coverage across larger sections.
Work in overlapping passes with approximately 50 percent overlap to ensure complete coverage without missed sections. Missed sections receive no chemical dwell time and remain contaminated through the rinse phase.
Step 5: Allow Full Dwell Time Before Rinsing
After completing soap application across the entire surface, allow the solution to dwell on the surface for 3 to 5 minutes. This contact period allows the surfactant compounds in the soap to penetrate contamination layers and break their bond with the surface chemically.
Do not allow soap to dry on the surface during dwell time. In direct sunlight or warm ambient temperatures, drying can begin within 2 to 3 minutes on a fully covered surface. Work smaller sections if conditions are causing premature drying, completing the rinse cycle for each section before moving to the next.
Monitor the soap film during dwell time. Visible active soaking and slight color change in the soap film as it lifts grime confirms the chemical action is working correctly before rinsing begins.
Step 6: Rinse Thoroughly from Top to Bottom
Remove the black soap nozzle and install the appropriate rinse nozzle for the surface being cleaned. The green 25-degree tip handles most concrete and hard surfaces. The white 40-degree tip is correct for wood, siding, and vehicles.
Begin rinsing from the top of vertical surfaces downward. This direction carries loosened soap and lifted contamination downward away from already-rinsed areas, preventing dirty water from streaking over clean sections below.
Rinse each section until water runs completely clear with no soap bubbling visible on the surface. Soap residue left on the surface after rinsing accelerates future dirt adhesion and can cause streaking when the surface dries.
Ryobi Model-Specific Soap System Details
Different Ryobi electric models handle soap application differently depending on whether they include an onboard tank, a siphon tube system, or compatibility with a foam cannon attachment. Knowing your specific model’s system prevents compatibility frustrations.
Models With Onboard Detergent Tanks
| Ryobi Model | PSI | Tank Capacity | Tank Location | Flow Control Valve |
|---|---|---|---|---|
| RY141820 | 1,800 | 0.9 liter | Side panel | Yes |
| RY142022 | 2,000 | 1.0 liter | Rear housing | Yes |
| RY142300 | 2,300 | 1.0 liter | Side panel | Yes |
| RY141612 | 1,600 | No tank | N/A | Siphon tube only |
| RY803001 | 2,000 | 0.9 liter | Side panel | Yes |
Models without an onboard tank use a siphon tube that draws soap from an external container placed near the machine during operation. The siphon tube connects to the same downstream injection point and operates identically to the tank system, requiring the black nozzle to activate venturi pickup.
Using a Foam Cannon as an Alternative Soap System
A foam cannon connects directly to the trigger gun outlet port in place of the wand, replacing the downstream injection system entirely with a higher-output foam delivery mechanism. This option produces significantly thicker, clinging foam compared to the onboard tank system.
The foam cannon is particularly effective for vehicle washing where foam thickness and dwell time on vertical painted panels matter most. It connects via the standard 1/4-inch quick-connect outlet on all current Ryobi trigger gun assemblies.
The tradeoff is that a foam cannon requires carrying an external bottle of soap solution and completing a separate attachment and detachment step between the foam phase and the rinse phase. For users who clean the same surfaces repeatedly, the foam cannon investment pays back in improved results within a few sessions.
Soap Performance Comparison by Surface and Product Type
| Surface Type | Recommended Soap Type | Dilution in Tank | Dwell Time | Rinse Nozzle |
|---|---|---|---|---|
| Concrete driveway | Concrete degreaser or all-purpose | 1:5 ratio | 5 minutes | Green 25-degree |
| Wood deck | Deck cleaner or all-purpose | 1:7 ratio | 4 minutes | White 40-degree |
| Vinyl siding | House wash concentrate | 1:6 ratio | 3 minutes | White 40-degree |
| Vehicle paint | Car wash concentrate | 1:8 ratio | 3 minutes | White 40-degree |
| Brick and masonry | All-purpose or masonry cleaner | 1:5 ratio | 5 minutes | Green 25-degree |
| Outdoor furniture | All-purpose cleaner | 1:8 ratio | 3 minutes | White 40-degree |
Concrete and masonry surfaces tolerate stronger dilutions and longer dwell times than painted or coated surfaces. Vehicle paint and wood require more conservative dilutions to protect surface coatings and minimize the risk of chemical etching during the dwell period.
Troubleshooting Common Soap Application Problems
Soap Not Coming Out Despite Correct Nozzle
If the black 65-degree nozzle is installed and no soap appears in the water stream, check the tank flow control valve first. A valve accidentally left in the closed position from the previous session is the most common cause of this exact symptom.
If the valve is confirmed open, remove the tank and inspect the pickup tube for blockage. Soap residue from previous sessions can dry inside the pickup tube and partially or fully block the narrow internal passage. Rinse the tube with warm water and a thin brush to clear any dried soap deposit.
If the tube is clear and the valve is open, check the O-ring at the tank connection point where the pickup tube enters the machine body. A cracked or missing O-ring allows air to enter the system at the connection point, preventing the venturi from generating adequate suction to draw soap from the tank.
Soap Coming Out Too Weakly to Clean Effectively
Weak soap concentration in the output stream despite a full tank indicates the venturi effect is underperforming. This occurs when the black nozzle is partially worn, allowing slightly higher pressure through the tip than the venturi system requires for effective soap pickup.
Inspect the black nozzle tip orifice for visible enlargement or damage to the spray pattern edges. A worn black tip that no longer delivers the correct low-pressure output should be replaced rather than cleaned. Replacement tips are available directly from Ryobi as individual items or in complete five-tip sets.
Increasing soap concentration in the tank slightly above the standard starting dilution compensates for mild venturi inefficiency in the short term while a replacement tip is sourced.
Soap Residue Remaining After Rinsing
Visible soap residue on the surface after what appears to be a thorough rinse indicates either insufficient rinsing pressure, insufficient rinse water volume, or a soap dilution that was too concentrated in the tank.
Switch to the green 25-degree nozzle for a secondary rinse pass on the affected areas. The higher effective pressure of the green tip dislodges soap film from textured surfaces like concrete and brick where the white tip’s wider pattern may leave insufficient impact force to fully clear soap from surface pores.
Frequently Asked Questions
How do I use soap with a Ryobi electric pressure washer?
Fill the onboard detergent tank with a correctly diluted pressure washer compatible soap solution. Confirm the tank flow control valve is open. Install the black 65-degree soap nozzle on the wand using the quick-connect fitting. Power on the machine and apply soap from the bottom of the surface upward in overlapping passes at 12 to 18 inches standoff distance.
Allow 3 to 5 minutes of chemical dwell time before switching to the appropriate rinse nozzle. Rinse from top to bottom until water runs completely clear. Never apply soap through any nozzle other than the black tip, as high pressure prevents the injection system from drawing detergent correctly.
Why is no soap coming out of my Ryobi pressure washer?
The most common cause is using the wrong nozzle. Only the black 65-degree soap tip activates the downstream injection system. Any other nozzle maintains high system pressure that prevents the venturi from drawing soap from the tank.
If the black tip is installed and soap still does not flow, check that the tank flow control valve is open and the tank contains diluted soap rather than water. Inspect the pickup tube for dried soap blockage and check the O-ring at the tank connection point for cracking or displacement.
What soap can I use in my Ryobi pressure washer tank?
Use only pressure washer compatible cleaning products. Simple Green All-Purpose Cleaner, exterior house wash concentrates, car wash soaps specifically formulated for pressure washer use, and concrete degreasers in machine-safe formulations are all appropriate choices.
These products work correctly with downstream injection systems, rinse completely without residue, and do not attack the rubber seals and O-ring materials inside the injection pathway. Avoid standard dish soap, undiluted bleach, solvent-based cleaners, and any abrasive compound. Incompatible chemicals cause progressive seal degradation that produces leaks and reduced cleaning performance over time.
Do I need to dilute soap before putting it in the Ryobi detergent tank?
Yes, always dilute soap before filling the tank. The downstream injection system dilutes the tank contents further as it draws soap into the water stream, which means undiluted concentrate in the tank produces higher effective surface concentration than most surfaces and cleaning tasks require.
A starting dilution of 1 part concentrated soap to 5 to 10 parts water handles most general cleaning tasks effectively. For heavily contaminated surfaces, reduce to 1 part soap to 3 parts water. For vehicles, follow the soap manufacturer’s dilution recommendation and reduce slightly further to account for secondary dilution in the injection system.
Can I use bleach in my Ryobi pressure washer for mold and mildew?
Diluted bleach solutions can be used in the Ryobi downstream injection system at concentrations no higher than 3 percent for mold and mildew treatment on appropriate surfaces. Higher concentrations damage the nitrile and rubber seals in the injection pathway and cause progressive leak development.
Flush the entire soap system with clean water immediately after any bleach application by running clean water through the tank and pickup tube with the black nozzle installed for at least 60 seconds. This prevents residual bleach from continuing to contact seal materials between sessions and slowing the degradation process.
How do I clean the Ryobi detergent tank after use?
Empty any remaining soap solution from the tank immediately after each session. Rinse the tank thoroughly with clean water, shaking to dislodge any soap residue from internal surfaces. Leave the tank cap off during storage to allow complete air drying and prevent mold growth inside the tank body.
For occasional deep cleaning of the full injection pathway, fill the tank with clean water, install the black nozzle, and run the machine briefly to flush the pickup tube, injection point, and all connecting passages. This prevents soap residue from drying inside the system and gradually blocking the narrow venturi pickup passage between sessions.
Can I attach a foam cannon to my Ryobi instead of using the onboard tank?
Yes. A foam cannon attaches to the trigger gun outlet port where the wand normally connects, replacing the onboard system entirely. The foam cannon produces significantly thicker, more clingy foam than the downstream injection system, making it particularly effective for vehicle washing.
Ryobi trigger guns use a standard 1/4-inch quick-connect outlet compatible with most universal foam cannons. Fill the foam cannon bottle with correctly diluted car wash soap, adjust the fan and ratio knobs, and apply foam before rinsing with the standard wand and rinse nozzle. Remove the foam cannon and reattach the wand for the rinse phase.
How long should I leave soap on the surface before rinsing?
Allow 3 to 5 minutes of dwell time for most cleaning tasks. This contact period lets surfactant compounds in the soap penetrate surface contamination layers and break their chemical bond with the material, reducing the mechanical work needed during rinsing and delivering cleaner results than immediate rinsing would produce.
Do not allow soap to dry on any surface. In warm or sunny conditions, reduce each soap application section to a size you can rinse within the dwell window before the soap film begins to dry. Dried soap residue on the surface is harder to remove than the original contamination and leaves streaking visible after the surface dries.
What is the correct nozzle for rinsing after soap application on a Ryobi?
The correct rinse nozzle depends on the surface being cleaned. The green 25-degree nozzle handles concrete driveways, patios, brick, and masonry surfaces effectively. The white 40-degree nozzle is correct for wood decking, vinyl siding, vehicle paint, and outdoor furniture.
Never rinse through the black 65-degree soap nozzle. Its wide, low-pressure pattern does not provide sufficient impact force to remove soap residue and loosened contamination effectively. Always replace the black tip with the appropriate rinse tip immediately after completing soap application and before beginning the rinse phase of each session.
Conclusion
Using soap correctly on a Ryobi electric pressure washer requires four things done in the right sequence: correct soap selection, proper tank dilution, the black 65-degree nozzle for application, and adequate dwell time before rinsing.
The downstream injection system only draws soap when the black tip creates the venturi effect at the injection point. Every other nozzle produces plain water regardless of how full the tank is.
Knowing how to use soap with Ryobi electric pressure washer models correctly transforms the machine from a simple rinse tool into a complete chemical-mechanical cleaning system that produces professional results on vehicles, siding, decking, and concrete with every session.